Install GriMoire end to end
This is the full installation track. It takes you from the source repository to a working SharePoint web part that can search, recap, and trigger Agent 365-backed actions.
1. Clone the repository
git clone git@github.com:grimoire-hie/grimoire-spfx.git
cd grimoire-spfx
You should see at least these directories and files:
grimoire-backend/grimoire-webpart/New-Agent365ToolsServicePrincipalProdPublic.ps1
2. Deploy or configure the backend
Provision the Azure Function backend that fronts model access, speech synthesis, persistence, and MCP session execution.
cd grimoire-backend
npm install
npm run deploy
The deployment script is interactive. It checks for node, az, and func, then prompts you for Azure settings such as:
- resource group and region
- Foundry resource name
- Function App name and storage account name
- SharePoint CORS origin
- model choices for reasoning, fast, and realtime
- Speech resource settings
The deployment completes and prints a summary with at least:
Proxy URLProxy API KeyBackend API URI
The deployment summary also prints a ready-to-use smoke test command at the bottom:
To run smoke tests: npm run test:proxy -- <Proxy URL> <Proxy API Key> <CORS origin>
Run the printed smoke test command to confirm the backend is healthy before moving on. You can also open the Proxy URL with /health appended in a browser.
3. Capture the backend outputs
Record the Proxy URL, Proxy API Key, and Backend API URI from the deployment output. You will enter them later into the web part property pane.
4. Install, build, and package the SPFx web part
Make sure you are using Node.js 22 or later.
cd ../grimoire-webpart
npm install
npm run build
This build path runs Heft and packages the solution. The output is:
sharepoint/solution/grimoire-spfx.sppkg
5. Deploy the .sppkg package
- Open the tenant app catalog.
- Upload
sharepoint/solution/grimoire-spfx.sppkg. - SharePoint shows a deployment dialog listing 19 permission requests and a "full trust client-side code" warning. This is standard for SPFx solutions that declare
webApiPermissionRequests— it does not mean the solution has application-level access. All 19 permissions are delegated scopes: they run in the context of the signed-in user and are limited to what that user can already access. - Confirm the deployment prompt.
- Enable the app if SharePoint asks you to do so.
After deployment, the 19 permission requests are pending in the SharePoint Admin Center. They need to be approved in the next step.
6. Approve SharePoint and Agent 365 permission requests
The SPFx package declares Microsoft Graph, Backend API, and Agent 365 scopes through webApiPermissionRequests in its manifest. All scopes are delegated — they act on behalf of the signed-in user, not as an application with tenant-wide access. Deployment alone does not make those scopes usable — a tenant admin must approve them.
Declared permissions
The solution manifest requests these 19 permissions:
Microsoft Graph (8 scopes)
| Scope | Purpose |
|---|---|
Sites.Read.All | SharePoint site and list access |
Files.Read.All | OneDrive and SharePoint file access |
People.Read | People suggestions |
User.Read.All | User profile and directory |
Mail.Read | Outlook mailbox search |
Chat.Read | Teams chat messages |
ChannelMessage.Read.All | Teams channel messages |
ExternalItem.Read.All | External data connector items |
Grimoire Backend API (1 scope)
| Scope | Purpose |
|---|---|
user_impersonation | Delegated access to user notes and preferences |
The backend API app registration is created automatically by the deploy script. This scope allows the web part to authenticate to the backend's user data routes via Easy Auth.
Agent 365 Tools (10 scopes)
| Scope | Purpose |
|---|---|
McpServers.OneDriveSharepoint.All | OneDrive and SharePoint actions |
McpServers.SharepointLists.All | SharePoint list operations |
McpServers.Mail.All | Outlook mail actions |
McpServers.Calendar.All | Calendar actions |
McpServers.Teams.All | Teams actions |
McpServers.Me.All | User profile actions |
McpServers.CopilotMCP.All | Copilot search actions |
McpServers.Dataverse.All | Dataverse operations |
McpServers.Word.All | Word document actions |
McpServers.Management.All | Management operations |
Approval steps
- Open the SharePoint Admin Center.
- Go to Advanced → API access.
- Review the pending permission requests created by the GriMoire package.
- Approve the Graph scopes, the Backend API scope, and the Agent 365 scopes.
7. Run the Agent 365 service principal script
Create the Service Principal for the Agent 365 Tools application in your Microsoft Entra ID tenant. This is a one-time tenant operation.
The 10 Agent 365 scopes declared in the SPFx manifest (McpServers.OneDriveSharepoint.All, McpServers.Mail.All, etc.) need to resolve against a known application in the tenant. This script registers that application's service principal so that SharePoint API access approval can grant delegated access to the Agent 365 tooling servers.
What the script does
- Installs the
Microsoft.Graph.ApplicationsandMicrosoft.Graph.AuthenticationPowerShell modules if missing - Connects to Microsoft Graph with the
AppRoleAssignment.ReadWrite.Allscope - Checks whether the Agent 365 Tools service principal already exists
- If not, creates it using the well-known application ID (
ea9ffc3e-8a23-4a7d-836d-234d7c7565c1)
Commands
From the repository root:
pwsh ./New-Agent365ToolsServicePrincipalProdPublic.ps1
Required role: Application Administrator or Global Administrator.
The script reports either that the service principal already exists, or that it created it successfully.
This script follows the same procedure described in the official Microsoft documentation: Add and manage tools — Set up service principal. The original script is available at microsoft/Agent365-devTools.
8. Obtain the Power Platform Environment ID
The web part uses the environment GUID to resolve the Agent 365 tooling gateway URLs.
See Find your environment and organization IDs for how to locate it.
9. Add the web part to a SharePoint page
- Open a SharePoint site where the app is available.
- Create or edit a modern page.
- Insert the GriMoire web part from the web part picker.
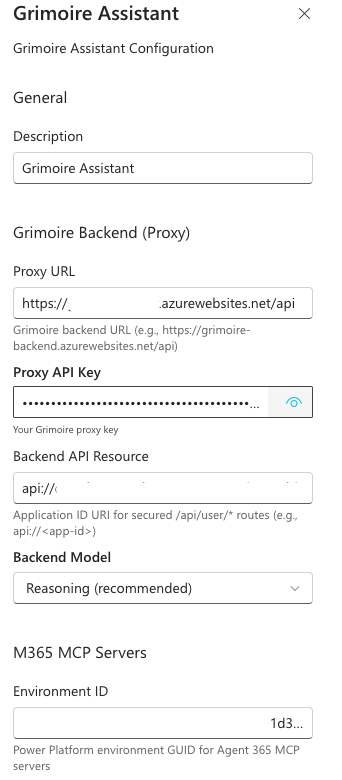
10. Configure the property pane values
Connect the deployed web part to the backend and Agent 365 environment you prepared earlier.
Enter these values:
Proxy URL→ from the backend deployment outputProxy API Key→ from the backend deployment outputBackend API Resource→ theBackend API URIfrom the backend deployment output (format:api://<app-id>)Backend Model→ normallyReasoning (recommended)Environment ID→ the Power Platform environment GUID
11. Verify health and first-use scenarios
Minimum verification
- Run the smoke test command printed by the deployment script (
npm run test:proxy -- ...) or open the health endpoint in a browser. - Load the SharePoint page with the web part.
- Ask for a capability overview to confirm the assistant is alive.
Full verification
Try these scenarios in order:
- Ask GriMoire what it can do.
- Search for SharePoint content.
- Generate a recap from the visible result block.
- Ask it to send that recap by mail.
You should see:
- the web part responding in-page
- search results rendering as UI blocks
- recap output being generated
- Agent 365-backed mail flow becoming available
Final checklist
- backend deployed and healthy
Proxy URL,Proxy API Key, andBackend API URIrecorded- SPFx package built
.sppkguploaded- API access approved (8 Graph + 1 Backend API + 10 Agent 365 scopes)
- Agent 365 service principal script run successfully
- Power Platform
Environment IDcaptured - web part added to a page
- property pane configured
- first full scenario verified